Orchid Care
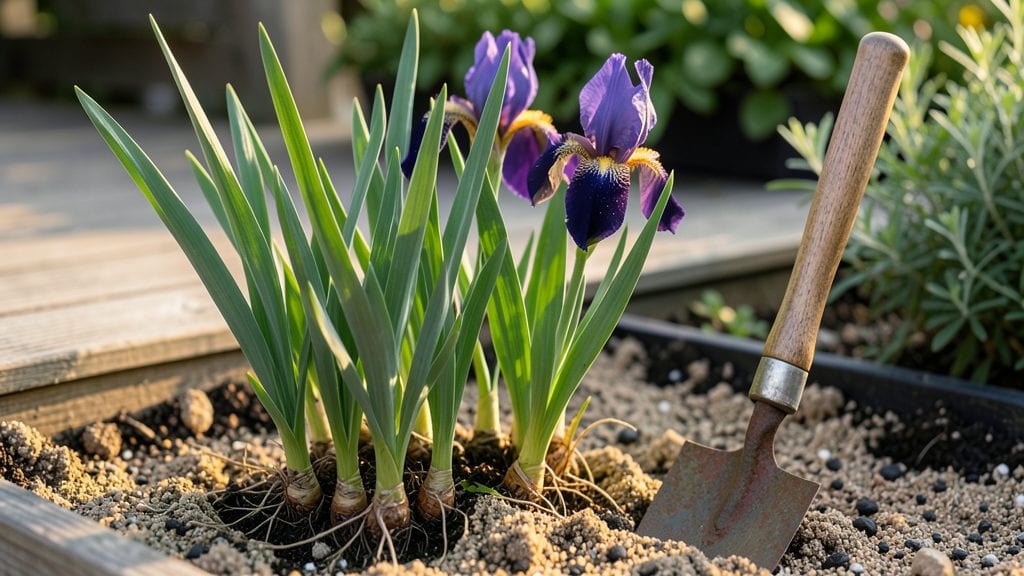
Planting iris roots in fall can transform your garden with jewel-toned blooms that last for weeks. I’ve learned the hard way—planting them too deep or at the wrong time means no flowers next spring.
The secret lies in the soil, spacing, and knowing exactly where those thick, fleshy roots should sit.
You’ll need well-draining soil, a sunny spot with at least 6 hours of light, and a fork to loosen the ground. Iris roots (rhizomes) must sit half above soil, never buried deep—this prevents rot and encourages strong growth.
Mulch lightly with compost after planting to lock in moisture without smothering them.
After planting, water gently but don’t drown them—iris roots hate soggy soil. Within 2-3 weeks, new shoots will emerge, and by next spring, you’ll have bold, sword-like foliage leading to clusters of blooms. The key is patience; iris roots take time to establish, but the payoff is worth it.
Works best in zones 3-9, but adjust timing—fall planting gives roots time to root before winter, while spring planting (after last frost) still works if you act fast. Avoid these mistakes: burying rhizomes too deep, overwatering, or planting in heavy clay. Here’s how to nail it every time.
📚 In This Guide
- What you need
- Instructions
- Tips and common mistakes
- Wrapping up and next steps
What you need
- ● Iris rhizomes: Healthy, firm roots with at least one fan of leaves (3–5 rhizomes per plant is ideal).
- ● Garden soil: Well-draining, slightly sandy loam (amend with compost for fertility).
- ● Garden fork or tiller: For loosening soil to a depth of 12–18 inches.
- ● Garden gloves: To protect hands from sharp rhizome edges.
- ● Sharp knife or pruners: Sterilized for trimming damaged roots or leaves.
- ● Bone meal or balanced fertilizer (10-10-10): 1–2 tablespoons per rhizome for nutrient boost.
- ○ Mulch (optional but recommended): Straw, pine needles, or shredded bark to retain moisture.
- ● Soil test kit: To check pH (ideal range: 6.0–7.0).
- ● Raised bed or containers: For better drainage if your soil is heavy clay.
- ● Systemic fungicide: To prevent rot in damp climates.
- ● Plant markers: To track varieties if testing multiple types.
- ● Watering can with a rose attachment: For gentle, even hydration.
Step-by-Step instructions for planting iris roots
Here's how to plant iris rhizomes for vibrant blooms that return year after year.
Prepare the Planting Site
Choose a location with full sun exposure—at least 6 hours of direct sunlight daily. Iris thrives in well-draining soil with a slightly alkaline pH between 6.5 and 7.5. If your soil is heavy clay, amend it with 2-3 inches of coarse sand or grit mixed into the top 12 inches of soil to improve drainage.
Loosen the soil to a depth of 12 inches using a garden fork or tiller. This breaks up compacted layers and encourages root penetration. Avoid adding organic matter like compost, as it can make the soil too rich and lead to weak, floppy growth. Instead, focus on creating a loose, gritty texture that mimics the natural conditions iris prefers.
Position and Plant the Rhizomes
Iris rhizomes should be planted 2-3 inches deep, with the narrow, pointed end facing upward. This ensures the rhizome grows in the correct orientation and avoids stunted growth. Space rhizomes 12-24 inches apart in rows, depending on the variety—taller irises need more space to prevent overcrowding.
Plant in early fall for a spring bloom or late winter to allow roots to establish before summer heat. Press the rhizome lightly into the soil so it sits firmly but isn’t buried too deeply. The top of the rhizome should remain just above the soil line—this prevents rot and allows for proper air circulation.
Water and Mulch for Establishment
Water the newly planted rhizomes deeply immediately after planting to settle the soil around them. Keep the soil moist but not soggy for the first 4-6 weeks while roots establish. Avoid overhead watering, as wet foliage can encourage fungal diseases. Instead, water at the base of the plant for targeted moisture.
Apply a 2-inch layer of mulch around the rhizomes, keeping it 2 inches away from the base to prevent rot. Use gravel, pebbles, or coarse sand—these materials improve drainage and reflect heat, which iris appreciates. Avoid organic mulches like wood chips, as they break down and alter soil conditions over time.
Provide Ongoing Care for Strong Growth
Once established, iris requires minimal care but benefits from balanced fertilizer in early spring. Apply a low-nitrogen, high-phosphorus fertilizer (such as a 5-10-10 formula) to encourage blooming. Follow the package instructions for application rates, and water lightly after fertilizing to help nutrients penetrate the soil.
Deadhead spent blooms by cutting the flower stalk back to the base once it fades. This redirects the plant’s energy into next year’s growth rather than seed production. In late summer or early fall, you can divide mature clumps every 3-4 years to maintain vigor and prevent overcrowding.
Monitor for Pests and Diseases
Iris is generally low-maintenance but can attract iris borers, a common pest. Watch for chewed leaves or frass (insect debris) as early signs. If detected, remove affected leaves immediately and treat with neem oil or an insecticidal soap according to label instructions. Avoid chemical pesticides, as they can harm beneficial insects and the environment.
Ensure proper airflow by spacing plants correctly and avoiding dense mulch layers. If you notice yellowing leaves or soft, mushy rhizomes, these are signs of root rot—likely from overwatering or poor drainage. Adjust your watering habits and improve soil drainage to prevent recurrence. Healthy iris should have sturdy, upright foliage and vibrant blooms each season.
Tips & tricks for planting iris roots
A few strategic adjustments can make all the difference between iris that thrives and iris that struggles. These insights come from years of watching what works—and what doesn't—when planting these dramatic perennials.
Soil Texture is Everything: The 12-inch depth of loosened soil in Step 1 isn't just about breaking up compaction—it's about creating an environment where roots can spread freely. If your native soil feels dense even after loosening, mix in an additional 1-2 inches of coarse sand or perlite. This mimics the gravelly conditions iris prefers in its native Mediterranean habitats, where drainage is critical. Think of it as giving your rhizomes the perfect foundation to establish strong roots before summer heat arrives.
Rhizome Orientation Matters More Than You Think: That narrow, pointed end facing upward in Step 2 isn't just a suggestion—it's biological necessity. The growth point is always at the top, and planting it upside down will result in stunted, weak growth. Here's a visual cue: Imagine the rhizome as a boat—you want it to float with the pointed end up, just like a bow cutting through water. If you're unsure which end is which, look for the small, slightly raised bump where the roots emerge—this is the top.
Timing Your Planting for Success: The early fall or late winter windows in Step 2 aren't arbitrary—they're about avoiding two critical growing periods. Planting in spring means the rhizomes will compete with summer heat for root establishment, while planting in summer exposes them to drought stress. Think of these timing windows as giving your iris a head start: in fall, roots can establish before winter dormancy, and in late winter, they're ready to burst into growth as temperatures rise. Both approaches work, but neither should be rushed.
Mulch Placement is a Delicate Balance: The 2-inch layer of gravel or pebbles in Step 3 serves two purposes: it reflects heat to warm the rhizomes (which love warmth) while preventing soil from splashing onto the leaves during watering. The key detail here is keeping mulch 2 inches away from the base—this creates that crucial air gap that prevents rot. I've seen many gardeners unknowingly smother their iris by piling mulch right against the rhizomes, which traps moisture and invites fungal problems. Think of it as creating a microclimate that mimics the dry, sunny conditions iris thrives in.
Pro Tips for Planting Iris Roots
- A few strategic adjustments can make all the difference between iris that thrives and iris that struggles. These insi...
- Soil Texture is Everything: The 12-inch depth of loosened soil in Step 1 isn't just about breaking up compaction—it's...
- Rhizome Orientation Matters More Than You Think: That narrow, pointed end facing upward in Step 2 isn't just a sugges...
Frequently asked questions
Got questions about planting iris roots? You’re not alone—this step can feel tricky, but we’ve got answers! Here are some of the most common concerns and how to tackle them like a pro.
When is the best time to plant iris roots?
The ideal window is late summer to early fall (August–October), when the foliage starts yellowing. This gives roots time to establish before winter. Spring planting is possible but riskier—roots may dry out before blooming. Avoid planting in extreme heat or frost.
What if my iris roots look dry or shriveled?
Don’t panic! Soak the roots in lukewarm water for 1–2 hours before planting to rehydrate them. If they’re mushy or rotting, trim the damaged parts with sterilized scissors and replant only the healthy sections. Pro tip: Avoid overwatering afterward—iris roots prefer well-draining soil.
Can I divide and replant iris roots from an existing clump?
Dig up mature clumps (3+ years old) in fall, gently separate the roots with your hands or a knife, and replant the healthiest sections with 3–5 fans (leaves) per division. Discard small, weak pieces—they won’t thrive. This rejuvenates blooms and prevents overcrowding!
What’s the best soil mix for iris roots?
Iris roots hate soggy soil—aim for a sandy, gritty mix with 50% native soil, 30% compost, and 20% perlite or coarse sand. Raised beds or slopes improve drainage. Avoid clay-heavy soil unless amended heavily. A pH of 6.0–7.0 is ideal.
Why aren’t my iris roots blooming after planting?
Patience is key! Iris roots need 1–2 years to establish before blooming. Check for:
- Sunlight: At least 6+ hours of full sun daily.
- Depth: Plant rhizomes halfway exposed (never buried).
- Fertilizer: Use a low-nitrogen, high-phosphorus feed in early spring.
- Pests: Watch for iris borers—treat with neem oil if needed.
Wrapping up and next steps
Planting iris roots is your ticket to stunning, long-lasting blooms that bring color and elegance to your garden! 🌸 By following these precision steps—choosing the right soil, preparing the roots, and timing your plantings—you’ll set your irises up for success.
Remember, patience and care pay off with vibrant flowers year after year.
Ready to transform your garden? Grab your tools, pick a sunny spot, and get planting! For extra confidence, bookmark this guide or jot down your notes before diving in. Happy gardening—your irises are waiting for their big debut! 🌱✨